
If you are unable to map network drives on Windows 10, try these fixes! First, check if the computer you’re trying to connect to is turned off or if you have the correct permissions.
If the issue persists, contact your network administrator. Mapping network drives can be done through File Explorer by selecting “This PC” from the left pane and then selecting “Map network drive” on the Computer tab. Make sure to choose an available drive letter and enter the appropriate network path.
Additionally, you can force a network drive to reconnect by using the Command Prompt to delete the current mapping and then remap the drive.
Credit: learn.microsoft.com
Common Reasons For Unable To Map Network Drives
If you are experiencing issues with mapping network drives on Windows 10, there could be several common reasons behind this problem. In this section, we will explore some of the most frequent causes that might be preventing you from mapping network drives. Understanding these reasons will not only help you troubleshoot the issue but also allow you to seek appropriate solutions to fix the problem.
Incorrect Permissions
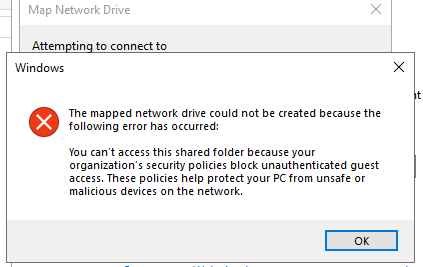
One of the primary reasons why you might be unable to map network drives on your Windows 10 system is incorrect permissions. File and folder permissions determine who can access and modify the data stored on a network drive. If you do not have the necessary permissions, you will encounter difficulties in mapping the drive. To resolve this issue, you can contact your network administrator to grant you the appropriate permissions. They will be able to adjust the settings and provide you with the necessary access rights to map the network drive successfully.
Computer Turned Off
If the computer you are trying to connect to is turned off, you will not be able to map network drives. It is essential to ensure that the target computer is powered on and accessible before attempting to map a network drive. If the computer is powered off, wait until it is restarted and then try mapping the drive again. This simple step can often resolve the issue and allow you to map the desired network drives effectively.
Network Administrator
In some cases, the problem may lie with the network administrator. They play a crucial role in managing and maintaining network resources, including network drives. If you are unable to map a network drive, it is worth reaching out to your network administrator for assistance. They will have the expertise to diagnose and resolve any network-related issues that might be affecting your ability to map drives. Furthermore, they can provide you with customized solutions based on your organization’s network infrastructure.
By understanding these common reasons for being unable to map network drives on Windows 10, you can take the necessary steps to troubleshoot and resolve the issue. Whether it is incorrect permissions, a computer being turned off, or a network administrator’s intervention, implementing the appropriate fixes will enable you to successfully map network drives and access the shared resources you need.
Fixes For Unable To Map Network Drives
If you are facing issues with mapping network drives on your Windows 10 system, don’t worry! There are a few troubleshooting steps you can try to resolve this problem. In this post, we will explore three effective fixes for the ‘Unable to Map Network Drives’ issue. Let’s get started!
Contact Network Administrator
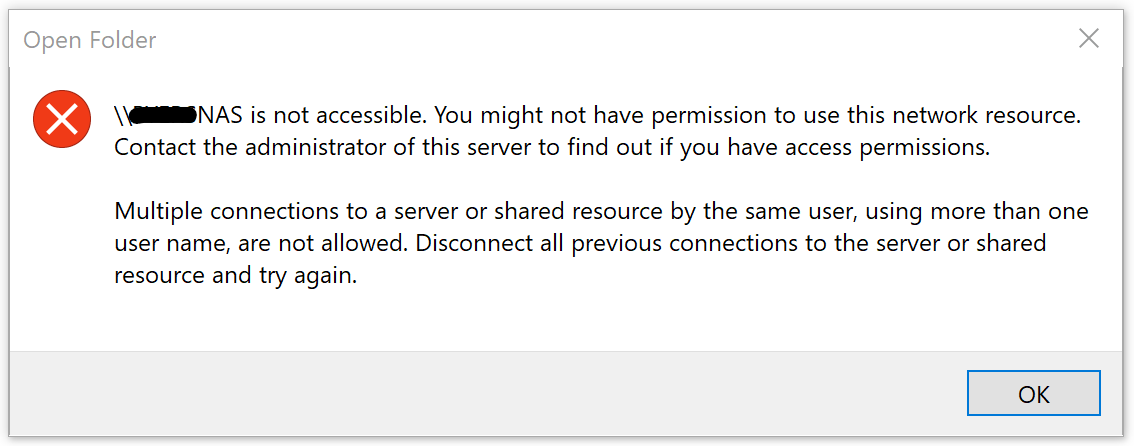
If you are unable to map network drives, the first step is to get in touch with your network administrator. There may be specific network restrictions or permissions that are preventing you from mapping the drives. The network administrator will be able to guide you and grant the necessary permissions to resolve the issue.
Force Network Drive Mapping
If contacting the network administrator doesn’t solve the problem, you can try forcing the network drive mapping manually. Follow these steps:
- Open File Explorer by clicking on the folder icon on your taskbar or pressing Windows Key+E.
- Select ‘This PC’ from the left pane.
- On the ‘Computer’ tab, click on ‘Map network drive’.
- Choose an available drive letter from the dropdown menu.
- Enter the network path of the folder you want to map in the ‘Folder’ field. For example, \\ServerName\ShareFolder.
- Check the box next to ‘Reconnect at sign-in’ to ensure the drive mapping persists across reboots.
- Click on ‘Finish’ to complete the mapping process.
Reconnect Network Drive
If the manual mapping does not work, you can try reconnecting the network drive. Follow these steps:
- Open the Command Prompt by typing ‘cmd’ in the search bar and pressing Enter.
- Type ‘net use’ and press Enter to view a list of all currently mapped network drives.
- Note down the name of the network drive you want to reconnect.
- Type ‘net use
: /delete’ (replace with the actual drive letter) and press Enter to delete the mapping. - Now, you can remap the network drive using the steps mentioned in the previous fix.
By following these three fixes, you should be able to resolve the issue of being unable to map network drives on your Windows 10 system. Try these troubleshooting steps and get your network drives up and running again!
Additional Troubleshooting Tips
If you are still unable to map network drives on your Windows 10 computer, there are a few additional troubleshooting tips you can try. Check out the following suggestions to resolve the issue:
Check Windows Credential Manager
One of the reasons why you might not be able to map network drives is due to incorrect or outdated credentials stored in the Windows Credential Manager. Here’s how you can check and update them:
- Press
Windows Key + Rto open the Run dialog box. - Type
control keymgr.dlland hitEnter. - In the Credential Manager window, select the Windows Credentials tab.
- Look for any outdated or incorrect credentials associated with the network drives you are trying to map.
- Select the credential and click on Remove to delete it.
- Restart your computer and try mapping the network drives again.
Delete Existing Credentials
If deleting credentials from the Windows Credential Manager doesn’t solve the problem, manually deleting the existing credentials might do the trick. Here’s how to do it:
- Press
Windows Key + Rto open the Run dialog box. - Type
regeditand hitEnterto open the Registry Editor. - Navigate to the following path:
HKEY_CURRENT_USER\Software\Microsoft\Windows\CurrentVersion\Explorer\Map Network Drive MRU. - On the right-hand pane, locate the entries corresponding to the network drives you are unable to map.
- Right-click on each entry and select Delete.
- Restart your computer and attempt to map the network drives again.
Check Nas Settings
If the above solutions didn’t work, it’s essential to ensure that the Network-attached Storage (NAS) device is correctly configured. Follow these steps:
- Check the IP address or hostname of the NAS device and ensure it is accessible on your local network.
- Verify that the NAS device is properly connected to the network and powered on.
- Ensure that the sharing and permissions settings are correctly configured on the NAS device to allow access from your Windows 10 computer.
- If necessary, consult the user manual or contact the manufacturer of the NAS device for specific instructions on configuring network drive access.
By following these additional troubleshooting tips, you should now be able to successfully map network drives on your Windows 10 computer. Happy networking!
Credit: answers.microsoft.com
Credit: learn.microsoft.com
Frequently Asked Questions For Can’t Map Network Drives On Windows 10? Try These Fixes!
Why Can’t I Map Network Drive?
If you can’t map a network drive, it could be because the computer you’re trying to connect to is turned off or you don’t have the correct permissions. Contact your network administrator for assistance. You can also try opening File Explorer, selecting This PC, and then clicking Map Network Drive to manually connect a drive.
How Do I Force A Network Drive To Map?
To force a network drive to map, follow these steps: 1. Open File Explorer and select This PC. 2. On the Computer tab, click on Map network drive. 3. Choose an available drive letter from the Drive list. 4. Enter the network drive’s location in the Folder box.
5. Click Finish to complete the mapping process.
Why Windows 10 Does Not Show Mapped Network Drives?
Windows 10 may not show mapped network drives if the computer you’re trying to connect to is turned off or if you don’t have the correct permissions. Contact your network administrator for assistance.
How Do I Force A Network Drive To Reconnect?
To force a network drive to reconnect, follow these steps: 1. Open File Explorer. 2. Select “This PC” from the left pane. 3. Click on the “Computer” tab. 4. Choose “Map network drive. ” 5. Select an available drive letter from the list.
6. Click “OK. ” Note: Make sure the computer you’re trying to connect to is turned on, and you have the correct permissions. Contact your network administrator if needed.
Conclusion
If you’re struggling to map network drives on Windows 10, don’t worry! There are several fixes you can try. First, make sure the computer you’re trying to connect to is turned on and that you have the correct permissions. If that doesn’t work, contact your network administrator for assistance.
You can also try opening File Explorer, selecting “Map network drive,” and choosing an available drive letter. Additionally, check your hidden files and folders settings, and delete any mapped drives that are causing issues. With these fixes, you’ll be able to successfully map your network drives on Windows 10 in no time!

I have been working as an SEO Expert in Bangladesh for a long time and now providing the best SEO Service in Bangladesh. With the approach to Semantic SEO that eschews superfluity. I can get your business web page at the top of the SERP list. Using the latest digital marketing trends, I can enhance your online visibility and drive more website traffic.